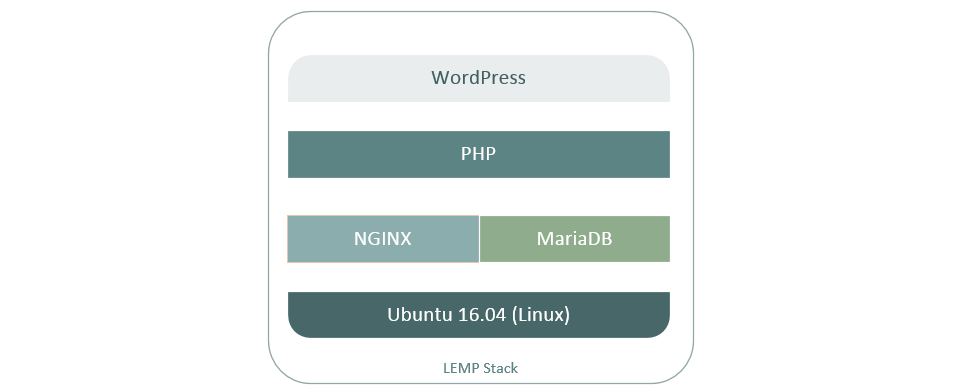
Production server environment setup, part 3.
This tutorial will guide you through the initial steps to take once you have created a new Ubuntu 16.04 instance (DigitalOcean droplet).
This tutorial sets up a single WordPress installation on a server with the option of adding more websites and domain names later.
This tutorial assumes you have:
1. Created a Ubuntu server instance (DigitalOcean droplet)
2. Setup your Ubuntu server
1. Configure Your Domain Name
Login to the site where you registered your domain name and change the nameservers to point to:
ns1.digitalocean.com
ns2.digitalocean.com
ns3.digitalocean.com
Then, go to your DigitalOcean account and go to Networking > Domains. In the form to “Add a Domain” enter your domain name and then select the droplet you created.
We will setup our domain to route email through Mailgun’s servers (free accounts available with no credit card needed). Check out this link to see how to setup Mailgun with DigitalOcean [http://code.krister.ee/mailgun-digitalocean/]. Once you have setup an account with Mailgun and completed the steps in the previous link, you will use these settings to configure your domain in DigitalOcean. When all done, your settings should look something like this (using Mailgun’s servers):

note: make sure that in the ‘TXT' record type that the text value (v=spf1… and k=rsa;…) is surrounded by quotes, as seen above.
2. Install Nginx
2.1 SSH into your server (using Putty or Git), then do:
$ sudo sh -c "echo 'deb http://download.opensuse.org/repositories/home:/rtCamp:/EasyEngine/xUbuntu_16.04/ /' >> /etc/apt/sources.list.d/nginx.list"
$ sudo apt-get update
$ sudo apt-get install nginx-custom
$ sudo ufw allow 'Nginx Full'
$ sudo ufw enable
2.2 Update settings in ‘nginx.conf' by commenting out all lines in the ‘SSL Settings' section by putting ‘#' in from of them (these will conflict with some of the settings we create later):
sudo nano /etc/nginx/nginx.conf
after you have done this, it should look like this:
##
# SSL Settings
##
#ssl_session_cache shared:SSL:20m;
#ssl_session_timeout 10m;
#ssl_prefer_server_ciphers on;
#ssl_ciphers ECDHE-RSA-AES128-GCM-SHA256:ECDHE-ECDSA-AES128-GCM-SHA256:$
#ssl_protocols TLSv1 TLSv1.1 TLSv1.2;
CTRL-X to save, then ‘Y' and ENTER to exit.
3. Install MariaDB
3.1 Install MariaDB. Why MariaDB instead of MySQL? MariaDB is a fork of MySQL and is just faster among other things. See the end of this tutorial for references to MySQL vs MariaDB:
$ sudo apt-get install software-properties-common
$ sudo apt-key adv --recv-keys --keyserver hkp://keyserver.ubuntu.com:80 0xF1656F24C74CD1D8
$ sudo add-apt-repository 'deb [arch=amd64,i386] http://sfo1.mirrors.digitalocean.com/mariadb/repo/10.1/ubuntu xenial main'
$ sudo apt-get update
$ sudo apt-get install mariadb-server
Set a password for MariaDB (recommended to use a different password than your user/root account).
3.2 Secure the install:
$ sudo mysql_secure_installation
Enter ‘no' when asked to change password (since we just setup a new one) and ‘yes' to the rest of the prompts.
3.3 Login to MariaDB:
$ mysql -u root -p
3.4 Create a new database, user and assign privileges to the user (replace ‘mydbname’, username and password with something strong, keep apostrophes in place):
MariaDB [(none)]> CREATE DATABASE mydbname DEFAULT CHARACTER SET utf8mb4 COLLATE utf8mb4_general_ci;
MariaDB [(none)]> GRANT ALL ON mydbname.* TO 'username'@'localhost' IDENTIFIED BY 'securepassword';
MariaDB [(none)]> FLUSH PRIVILEGES;
MariaDB [(none)]> quit
4. Install PHP7-FPM
4.1 Install PHP7-FPM:
$ sudo apt-get install -y php-fpm php-mysql php-xml php-gd php7.0-zip
4.2 Adjust php settings:
$ sudo nano /etc/php/7.0/fpm/php.ini
enter CTRL +W to access search function and type ‘cgi.fix_pathinfo'. Where you see the line ‘cgi.fix_pathinfo=1', uncomment the line (by deleting the semicolon) and edit as follows:
cgi.fix_pathinfo=0
Enter CTRL +W again and search for ‘post_max_size' and change this value to whatever size you would like. Do the same for ‘upload_max_filesize':
post_max_size = 100M
upload_max_filesize = 200M
CTRL-X to save, then ‘Y' and ENTER to exit.
4.3 Restart php:
$ sudo service php7.0-fpm restart
4.4 Create a new configuration file for our site (replace site.com with your domain name and you can also create and add the code below using WinSCP instead of the command line):
$ sudo nano /etc/nginx/sites-available/site.com
Copy/paste the code below into the file (replace site.com with your domain name):
server {
listen 80 default_server;
listen [::]:80 default_server;

root /var/www/site.com/html;
index index.php index.html;

server_name _;

location / {
try_files $uri $uri/ =404;
}

location ~ \.php$ {
include snippets/fastcgi-php.conf;
fastcgi_pass unix:/run/php/php7.0-fpm.sock;
}

location ~ /\.ht {
deny all;
}
}
CTRL-X to save, then ‘Y' and ENTER to exit.
4.5 Restart NGINX:
$ sudo service nginx restart
4.6 Test changes by creating a php file at the root of the web server:
$ echo "<?php phpinfo();" | sudo tee /var/www/html/index.php > /dev/null
Next, go to your web browser and type your server url, http://your-IP-address and you should see the auto-generated PHP info page.
5. Setup SSL Certificates with LetsEncrypt
5.1 Install LetsEncrypt:
$ sudo apt-get install letsencrypt
5.2 Edit the NGINX configuration file:
$ sudo nano /etc/nginx/sites-available/site.com
Add some extra code to the NGINX configuration file so that the entire file looks like this (I find it easier to edit the code using WinSCP instead of using the command line):
server {
listen 80 default_server;
listen [::]:80 default_server;

root /var/www/site.com/html;
index index.php index.html;

server_name _;

location / {
try_files $uri $uri/ =404;
}

location ~ \.php$ {
include snippets/fastcgi-php.conf;
fastcgi_pass unix:/run/php/php7.0-fpm.sock;
}

location ~ /.well-known {
allow all;
}

location ~ /\.ht {
deny all;
}
}
Note that we just added the lines below just before the last location code:
location ~ /.well-known {
allow all;
}
CTRL-X to save, then ‘Y' and ENTER to exit.
5.3 Check to make sure the NGINX syntax is correct:
$ sudo nginx -t
you should see something like:
nginx: the configuration file /etc/nginx/nginx.conf syntax is ok
nginx: configuration file /etc/nginx/nginx.conf test is successful
Then restart NGINX:
$ sudo service nginx restart
5.4 Install the LetsEncrypt certificate (replace site.com with your domain name):
$ sudo letsencrypt certonly -a webroot --webroot-path=/var/www/site.com/html -d site.com -d www.site.com
Enter an email address and accept the license.
If everything works OK, you should see something like this:
IMPORTANT NOTES:
- Congratulations! Your certificate and chain have been saved at
/etc/letsencrypt/live/yourdomain.com/fullchain.pem. Your cert
will expire on 2017-01-22. To obtain a new version of the
certificate in the future, simply run Let's Encrypt again.
- If you like Let's Encrypt, please consider supporting our work by:

Donating to ISRG / Let's Encrypt: https://letsencrypt.org/donate
Donating to EFF: https://eff.org/donate-le
5.5 To increase security, it is recommended to set up a strong Diffie-Hellman Group as follows:
$ sudo openssl dhparam -out /etc/ssl/certs/dhparam.pem 2048
Then create a configuration file that contains all of our SSL parameters:
$ sudo nano /etc/nginx/snippets/ssl-params.conf
Then, add this code into the file:
# code below from https://cipherli.st/
# and https://raymii.org/s/tutorials/Strong_SSL_Security_On_nginx.html

ssl_protocols TLSv1 TLSv1.1 TLSv1.2;
ssl_prefer_server_ciphers on;
ssl_ciphers "EECDH+AESGCM:EDH+AESGCM:AES256+EECDH:AES256+EDH";
ssl_ecdh_curve secp384r1;
ssl_session_cache shared:SSL:10m;
ssl_session_tickets off;
ssl_stapling on;
ssl_stapling_verify on;
resolver 8.8.8.8 8.8.4.4 valid=300s;
resolver_timeout 5s;
add_header Strict-Transport-Security "max-age=63072000; includeSubdomains; preload";
add_header X-Frame-Options SAMEORIGIN;
add_header X-Content-Type-Options nosniff;

ssl_dhparam /etc/ssl/certs/dhparam.pem;
CTRL-X to save, then ‘Y' and ENTER to exit.
5.6 Create a configuration file with our SSL parameters (replace site.com with your domain name):
$ sudo nano /etc/nginx/snippets/ssl-site.com.conf
Then, add this code into the file (replace site.com with your domain name):
ssl_certificate /etc/letsencrypt/live/site.com/fullchain.pem;
ssl_certificate_key /etc/letsencrypt/live/site.com/privkey.pem;
CTRL-X to save, then ‘Y' and ENTER to exit.
5.7 Next we will update our NGINX configuration for our site again to redirect all traffic through HTTPS (replace site.com with your domain name):
$ sudo nano /etc/nginx/sites-available/site.com
edit the file to look like this (replace site.com with your domain name):
server {
listen 80 default_server;
listen [::]:80 default_server;
server_name site.com www.site.com;
return 301 https://site.com$request_uri;
}

server {
listen 443 ssl http2 default_server;
listen [::]:443 ssl http2 default_server;
include snippets/ssl-site.com.conf;
include snippets/ssl-params.conf;

root /var/www/site.com/html;
index index.php index.html;

server_name site.com www.site.com;

location / {
try_files $uri $uri/ =404;
}

location ~ \.php$ {
include snippets/fastcgi-php.conf;
fastcgi_pass unix:/run/php/php7.0-fpm.sock;
}

location ~ /.well-known {
allow all;
}

location ~ /\.ht {
deny all;
}

}
CTRL-X to save, then ‘Y' and ENTER to exit.
5.8 Check to make sure the NGINX syntax is correct:
$ sudo nginx -t
then, restart NGINX:
$ sudo service nginx restart
5.9 SSL certificates from LetsEncrypt expire every 90 days. So that you don’t have to log into your server every 3 months to renew your certs, we set up a CRON job to autorenew them:
$ sudo crontab -e
You will be prompted to select an editor, select ‘2' (nano):
Then add the following lines at the bottom after the commented section:
30 2 * * 1 /usr/bin/letsencrypt renew >> /var/log/le-renew.log
35 2 * * 1 /bin/systemctl reload nginx
CTRL-X to save, then ‘Y' and ENTER to exit.
This will update the LetsEncrypt client and then attempt to renew and load your certs (if necessary) every Monday.
6. Install WordPress
6.1 First, we will install Subversion (We can install WordPress in other ways but this method is very simple):
$ sudo apt-get install -y subversion
Then, go to web root directory, remove index.php (if necessary), and note the most recent version of WordPress:
$ cd /var/www/site.com/html
$ sudo rm index.php
$ sudo svn co http://core.svn.wordpress.org/tags/4.6.1 .
note the ‘.' (period) at the end of the last command.
Then, update the ownership of the files:
$ sudo chown -R www-data:www-data .
again, note the ‘.' (period) at the end of the command.
Now you can visit your domain in a web browser and complete the installation by following the WordPress prompts. Note the database name and user that you created in step 3.4.
7. Installing WordPress plugins and setting up email.
7.1 Install the Nginx Helper plugin.
After logging in to the WP admin panel, go to Plugins > Add New, and in the ‘Search Plugins' box enter ‘nginx plugin helper'. Click ‘Install Now' and once completed, click ‘Activate'.
7.2 Go to Settings > Nginx Helper from the WP dashboard and check the box to “Enable Purge.” The default settings should be fine. Click ‘Save All Changes'.
7.3 From Step 1 above, we will use the Mailgun for WordPress plugin.
Go to Plugins > Add New, and in the ‘Search Plugins' box enter ‘mailgun' where you should see “Mailgun for WordPress”. Click ‘Install Now' and once completed, click ‘Activate'.
Then, go to Settings > Mailgun in the WP dashboard and copy/paste in your Mailgun domain name and API key, then click ‘Save Changes'. Click ‘Test Configuration' to make sure it is working. You can also use the Check Email plugin just to make sure that emails are being sent correctly.
Inside of your Mailgun dashboard, you may have to go to Domains > yourDomainName, go down the page ‘Security Settings For Outgoing Mail', click ‘Certificate Verification' and select ‘Not Required' (‘TLS Connection' should already be set to ‘Opportunistic').
7.4 Optional: To allow updates of wordpress without FTP, add this line to the ‘wp-config' file right before the line ‘That's all, stop editing!':
/** auto update without FTP */
define('FS_METHOD','direct');
alternatively, if you would like to only allow file downloads through FTPS, see this post:
8. Optimizing WordPress
8.1 Setup caching and purging. Edit NGINX configuration file, replace ‘site.com' and ‘www.site.com' with your domain name:
$ sudo nano /etc/nginx/sites-available/site.com
then copy/paste this in (deleting all other code):
server {
listen 80 default_server;
listen [::]:80 default_server;
server_name site.com www.site.com;
return 301 https://site.com$request_uri;
}

server {
listen 443 ssl http2 default_server;
listen [::]:443 ssl http2 default_server;
include snippets/ssl-site.com.conf;
include snippets/ssl-params.conf;

client_max_body_size 256M;
root /var/www/site.com/html;
index index.php index.html;

server_name site.com www.site.com;

set $skip_cache 0;
if ($request_method = POST) {
set $skip_cache 1;
}
if ($query_string != "") {
set $skip_cache 1;
}
if ($request_uri ~* "/wp-admin/|/xmlrpc.php|wp-.*.php|/feed/|index.php|sitemap(_index)?.xml") {
set $skip_cache 1;
}
if ($http_cookie ~* "comment_author|wordpress_[a-f0-9]+|wp-postpass|wordpress_no_cache|wordpress_logged_in") {
set $skip_cache 1;
}
autoindex off;
location ~ /purge(/.*) {
fastcgi_cache_purge WORDPRESS "$scheme$request_method$host$1";
}
location ~* ^.+\.(flv|pdf|avi|mov|mp3|wmv|m4v|webm|aac|ogg|ogv|svg|svgz|eot|otf|woff|mp4|ttf|css|rss|atom|js|jpg|jpeg|gif|png|ico|zip|tgz|gz|rar|bz2|doc|xls|exe|ppt|tar|mid|midi|wav|bmp|rtf)$ {
expires max;
log_not_found off;
access_log off;
}

location / {
try_files $uri $uri/ /index.php?$args;
}

location ~ \.php$ {
include snippets/fastcgi-php.conf;
fastcgi_pass unix:/run/php/php7.0-fpm.sock;
fastcgi_cache_bypass $skip_cache;
fastcgi_no_cache $skip_cache;
fastcgi_cache WORDPRESS;
fastcgi_cache_valid 60m;
include fastcgi_params;
}

location ~* ^/wp-includes/.*(?<!(js/tinymce/wp-tinymce))\.php$ {
internal;
}

location = /robots.txt {
access_log off;
log_not_found off;
}

location = /wp-config.php {
deny all;
}

location ~* /(?:uploads|files)/.*\.php$ {
deny all;
}

location ~* ^/wp-content/.*\.(txt|md|exe|sh|bak|inc|php|pot|po|mo|log|sql)$ {
deny all;
}

location ~ /.well-known {
allow all;
}

location ~ /\.(ht|svn)? {
deny all;
}
}
CTRL-X to save, then ‘Y' and ENTER to exit.
8.2 Edit nginx.conf
$ sudo nano /etc/nginx/nginx.conf
Copy the code below:
fastcgi_cache_path /var/run/nginx-cache levels=1:2 keys_zone=WORDPRESS:100m inactive=60m;
fastcgi_cache_key "$scheme$request_method$host$request_uri";
fastcgi_cache_use_stale error timeout invalid_header http_500;
fastcgi_ignore_headers Cache-Control Expires Set-Cookie;
And paste into the top of the ‘http’ section, right above ‘EasyEngine Settings’. The beginning of the file should look like this:
user www-data;
worker_processes auto;
worker_rlimit_nofile 100000;
pid /run/nginx.pid;

events {
worker_connections 4096;
multi_accept on;
}

http {
fastcgi_cache_path /var/run/nginx-cache levels=1:2 keys_zone=WORDPRESS:100m inactive=60m;
fastcgi_cache_key "$scheme$request_method$host$request_uri";
fastcgi_cache_use_stale error timeout invalid_header http_500;
fastcgi_ignore_headers Cache-Control Expires Set-Cookie;

##
# EasyEngine Settings
##

sendfile on;
tcp_nopush on;
tcp_nodelay on;
keepalive_timeout 30;
types_hash_max_size 2048;

… … do not edit the rest of the lines of code … …
CTRL-X to save, then ‘Y' and ENTER to exit.
8.3 Enable unattended upgrades:
$ sudo nano /etc/apt/apt.conf.d/50unattended-upgrades
uncomment these lines (delete the forward slashes in beginning of the line) and change values where necessary:
"${distro_id}:${distro_codename}-updates";
Unattended-Upgrade::Mail "[email protected]";
Unattended-Upgrade::Remove-Unused-Dependencies "false";
Unattended-Upgrade::Automatic-Reboot "true";
Unattended-Upgrade::Automatic-Reboot-Time "02:00";
The complete file looks like this:
// Automatically upgrade packages from these (origin:archive) pairs
Unattended-Upgrade::Allowed-Origins {
"${distro_id}:${distro_codename}-security";
"${distro_id}:${distro_codename}-updates";
// "${distro_id}:${distro_codename}-proposed";
// "${distro_id}:${distro_codename}-backports";
};

// List of packages to not update (regexp are supported)
Unattended-Upgrade::Package-Blacklist {
// "vim";
// "libc6";
// "libc6-dev";
// "libc6-i686";
};

// This option allows you to control if on a unclean dpkg exit
// unattended-upgrades will automatically run
// dpkg --force-confold --configure -a
// The default is true, to ensure updates keep getting installed
//Unattended-Upgrade::AutoFixInterruptedDpkg "false";

// Split the upgrade into the smallest possible chunks so that
// they can be interrupted with SIGUSR1. This makes the upgrade
// a bit slower but it has the benefit that shutdown while a upgrade
// is running is possible (with a small delay)
//Unattended-Upgrade::MinimalSteps "true";

// Install all unattended-upgrades when the machine is shuting down
// instead of doing it in the background while the machine is running
// This will (obviously) make shutdown slower
//Unattended-Upgrade::InstallOnShutdown "true";

// Send email to this address for problems or packages upgrades
// If empty or unset then no email is sent, make sure that you
// have a working mail setup on your system. A package that provides
// 'mailx' must be installed. E.g. "[email protected]"
Unattended-Upgrade::Mail "[email protected]";

// Set this value to "true" to get emails only on errors. Default
// is to always send a mail if Unattended-Upgrade::Mail is set
//Unattended-Upgrade::MailOnlyOnError "true";

// Do automatic removal of new unused dependencies after the upgrade
// (equivalent to apt-get autoremove)
Unattended-Upgrade::Remove-Unused-Dependencies "true";

// Automatically reboot *WITHOUT CONFIRMATION*
// if the file /var/run/reboot-required is found after the upgrade
Unattended-Upgrade::Automatic-Reboot "true";

// If automatic reboot is enabled and needed, reboot at the specific
// time instead of immediately
// Default: "now"
Unattended-Upgrade::Automatic-Reboot-Time "02:00";

// Use apt bandwidth limit feature, this example limits the download
// speed to 70kb/sec
//Acquire::http::Dl-Limit "70";
CTRL-X to save, then ‘Y' and ENTER to exit.
8.4 Then,
$ sudo nano /etc/apt/apt.conf.d/10periodic
edit the file to look like this:
PT::Periodic::Update-Package-Lists "1";
APT::Periodic::Download-Upgradeable-Packages "0";
APT::Periodic::AutocleanInterval "7";
APT::Periodic::Unattended-Upgrade "1";
CTRL-X to save, then ‘Y' and ENTER to exit.
And finally,
$ sudo apt-get update
$ sudo apt-get upgrade
$ sudo apt-get autoclean
$ sudo reboot
9. Installing phpMyAdmin (Optional)
9.1 Install phpMyAdmin
$ sudo apt-get install phpmyadmin
During the installation, you will be prompted for some information. It will ask you which web server you would like the software to automatically configure. Since Nginx, the web server we are using, is not one of the available options, you can just hit TAB to bypass this prompt.
The next prompt will ask if you would like dbconfig-common to configure a database for phpmyadmin to use. Select “Yes” to continue.
You will need to enter the database administrative password that you configured during the MariaDB installation to allow these changes. Afterward, you will be asked to select and confirm a password for a new database that will hold phpMyAdmin's own data.
9.2 Enable the mcrypt PHP module, which phpMyAdmin relies on. This was installed with phpMyAdmin so we just need to toggle it on and restart PHP:
$ sudo apt-get install mcrypt php7.0-mcrypt
$ sudo service php7.0-fpm restart
The installation will now complete. For the Nginx web server to find and serve the phpMyAdmin files correctly, we just need to create a symbolic link from the installation files to our Nginx document root directory by typing this:
$ sudo ln -s /usr/share/phpmyadmin /var/www/site.com/html
! See ERRORS & SOLUTIONS at the end of this tutorial
9.3 Securing phpMyAdmin. We will change the location of the interface from /phpmyadmin to something else to sidestep some of the automated bot brute-force attempts. We will also create an additional, web server-level authentication gateway that must be passed before even getting to the phpMyAdmin login screen:
$ cd /var/www/html

$ sudo mv phpmyadmin nothingtosee
Now to go to phpmyadmin, you must go to https://mydomain.com/nothingtosee or any other name you choose.
If you would like to setup an extra layer of protection by creating a password file that will store authentication credentials while setting restrictions on the server level or inside a specific location, check out the links below (I initially got it to work OK but later when changing nginx configurations for multiple sites, it failed and I have not got around to finding the cause and verifying possible solutions):
Solutions:
https://www.scalescale.com/tips/nginx/protect-directory-user-password-nginx/
DONE
In the next part of this series, we will move our local WordPress site (after we have finished the first increment of development) to the production Server.
ERRORS & SOLUTIONS
For the Nginx web server to find and serve the phpMyAdmin files correctly, we just need to create a symbolic link from the installation files to our Nginx document root directory by typing this:
$ sudo ln -s /usr/share/phpmyadmin /usr/share/nginx/html
the above was the recommended method but did not work – when I went to mydomain.com/phpmyadmin only mydomain.com displayed. The solution was found somewhere in the comments, below the section referenced here:
https://www.digitalocean.com/community/tutorials/how-to-install-and-secure-phpmyadmin-with-nginx-on-an-ubuntu-14-04-server?comment=36631
the solution was:
sudo ln -s /usr/share/phpmyadmin /var/www/html
However, after logging in, you are redirected to site.com/?token=abcde… where I have to manually put in my phpMyAdmin folder location before “?token” and after the ‘/’ like this: site.com/myPHPadminFolder/?token=… Not ideal but does provide an extra layer of security, so I don’t mind.
MySQL vs MariaDB
10 reasons to migrate to MariaDB (if still using MySQL)
https://seravo.fi/2015/10-reasons-to-migrate-to-mariadb-if-still-using-mysql
MariaDB versus MySQL – Features
https://mariadb.com/kb/en/mariadb/mariadb-vs-mysql-features/
MariaDB versus MySQL – Compatibility
https://mariadb.com/kb/en/mariadb/mariadb-vs-mysql-compatibility/
MariaDB vs MySQL on Amazon’s AWS RDS
http://cloudacademy.com/blog/mariadb-vs-mysql-aws-rds/
MariaDB 10.1 and MySQL 5.7 performance on commodity hardware
https://mariadb.org/maria-10-1-mysql-5-7-commodity-hardware/
REFERENCES
https://cipherli.st/
http://code.krister.ee/mailgun-digitalocean/
https://code.tutsplus.com/tutorials/get-a-fast-start-with-the-mailgun-plugin-for-wordpress–cms-21693
https://code.tutsplus.com/tutorials/grow-your-subscribers-with-the-mailgun-wordpress-plugin–cms-26316
https://raymii.org/s/tutorials/Strong_SSL_Security_On_nginx.html
https://subversion.apache.org/
https://wordpress.org/
https://wordpress.org/plugins/nginx-helper/
https://www.digitalocean.com/community/tutorials/how-to-create-your-first-digitalocean-droplet-virtual-server
https://www.digitalocean.com/community/tutorials/how-to-install-and-secure-phpmyadmin-with-nginx-on-an-ubuntu-14-04-server
https://www.digitalocean.com/community/tutorials/how-to-secure-nginx-with-let-s-encrypt-on-ubuntu-16-04
https://www.digitalocean.com/community/tutorials/how-to-set-up-a-host-name-with-digitalocean
https://www.digitalocean.com/community/tutorials/how-to-set-up-password-authentication-with-nginx-on-ubuntu-14-04<
http://www.internet-computer-security.com/VPN-Guide/Diffie-Hellman.html
http://www.morphatic.com/2016/05/21/super-fast-secure-wordpress-install-on-digitalocean-with-nginx-php7-and-ubuntu-16-04-lts/
https://www.scalescale.com/tips/nginx/protect-directory-user-password-nginx/