Local Development Environment Setup, Part 2
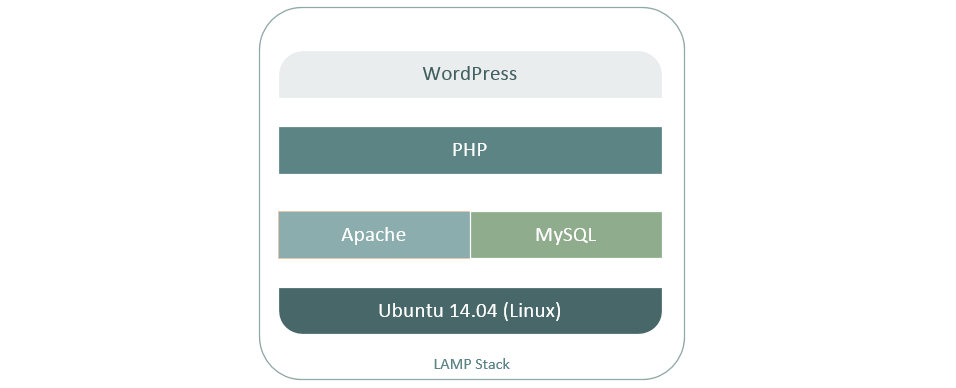
In Part 2 of our local development environment setup, we will install the LAMP stack. Linux (Ubuntu), Apache (web server), MySQL (database), Php (scripting language) This tutorial assumes you have already installed Ubuntu. If not, click here.
1. Update Ubuntu
From Git command line:
$ vagrant up
$ vagrant ssh
$ sudo apt-get update
$ sudo apt-get upgrade
2. Install apache server
$ sudo apt-get install apache2
3. Install MySQL
3.1 This will install MySQL version 5.7. If you already have MySQL 5.5 and would like to upgrade to MySQL 5.7, you will have to uninstall MySQL 5.5 then proceed with the steps below. See the bottom of this post “How to uninstall MySQL 5.5”. Also see References section at the bottom of this post to see where the latest mysql downloads are.
$ sudo apt-get update
$ sudo wget http://dev.mysql.com/get/mysql-apt-config_0.7.3-1_all.deb
$ sudo dpkg -i mysql-apt-config_0.7.3-1_all.deb
You'll see a prompt that asks you which MySQL product you want to configure. The MySQL Server option, which is highlighted, should say mysql-5.7. Press the TAB key which will take you to the ‘OK' button where you can press ENTER. Again, mysql-5.7 should be highlighted and you can press the TAB key again, then ‘OK'.
ERROR NOTE: I have had problems where the prompts would not let me proceed with the installation when I selected mysql 5.7. When pressing ‘OK' on the second screen, you are just redirected back to the first screen. One solution is that when you are redirected back to the first screen, scroll down to the ‘OK' option on the first screen, press the TAB key, then press ‘OK' again. You will exit from the menu and return to the command line. Then just continue with the code below. This will install 5.7.
3.2 Then:
$ sudo apt-get update
$ sudo apt-get install mysql-server php5-mysql
You'll be prompted to create a root password during the installation. Choose a secure one and make sure you remember it, because you will need it later.
To check the mysql version:
$ mysql --version
3.3 Then:
$ sudo mysql_secure_installation
You will be prompted to enter to password for the user root that you just created. Then follow the prompts.
Then you can select ‘y' or any othe key for No on each of the following prompts. Or you simply just hit ENTER to select No for each of the prompts since this is just being installed on your local pc.
- Would you like to setup VALIDATE PASSWORD plugin?
- Change the password for root?
- Remove anonymous users?
- Disallow root login remotely?
- Remove test database and access to it?
- Reload privilege tables now?
3.4 Testing MySQL:
$ sudo service mysql status
You'll see the following output:
* MySQL Community Server 5.7.16 is running
If MySQL isn't running, you can start it with:
$ sudo service mysql start
For an additional check, you can try connecting to the database using the mysqladmin tool, which is a client that lets you run administrative commands. For example, this command says to connect to MySQL as root (-u root), prompt for a password (-p), and return the version.
mysqladmin -p -u root version
You should see output similar to this:
mysqladmin Ver 8.42 Distrib 5.7.16, for Linux on x86_64
Copyright (c) 2000, 2016, Oracle and/or its affiliates. All rights reserved.
Oracle is a registered trademark of Oracle Corporation and/or its
affiliates. Other names may be trademarks of their respective
owners.

Server version 5.7.16
Protocol version 10
Connection Localhost via UNIX socket
UNIX socket /var/run/mysqld/mysqld.sock
Uptime: 13 min 34 sec

Threads: 1 Questions: 15 Slow queries: 0 Opens: 123 Flush tables: 1 Open tables: 42 Queries per second avg: 0.018
Additional options to tune MySQL or just skip to Step 4.
MySQL Tuner is a Perl script that connects to a running instance of MySQL and provides configuration recommendations based on workload. Ideally, the MySQL instance should have been operating for at least 24 hours before running the tuner. The longer the instance has been running, the better advice MySQL Tuner will give.
Install MySQL Tuner from Ubuntu’s repositories:
$ sudo apt-get install mysqltuner
To run it:
$ mysqltuner
You will be asked for the MySQL root user’s name and password. The output will show two areas of interest: General recommendations and Variables to adjust.
MySQL Tuner is an excellent starting point to optimize a MySQL server, but it would be prudent to perform additional research for configurations tailored to the application(s) utilizing MySQL.
See also: MySQL vs MariaDB at the end of this tutorial.
4. Install PHP
4.1 Install:
$ sudo apt-get install php5 libapache2-mod-php5 php5-mcrypt
4.2 To make the web server prefer PHP files over .html files (you can also open and edit the file ‘dir.conf' using WinSCP):
$ sudo nano /etc/apache2/mods-enabled/dir.conf
Then add the PHP index file to the first position:
<IfModule mod_dir.c>
DirectoryIndex index.php index.html index.cgi index.pl index.xhtml inde$
</IfModule>
Ctrl+x to save, ‘Y', the ‘ENTER’ to exit.
4.3 To allow larger post and uploaded filesizes (the default settings are probably insufficient and won't let you upload some plugins):
$ sudo nano /etc/php5/apache2/php.ini
Enter CTRL +W again and search for ‘post_max_size' and change this value to whatever size you would like. Do the same for ‘upload_max_filesize':
4.4 Restart the Apache web server:
$ sudo service apache2 restart
You will probably keep seeing this message each time you restart the server: “Could not reliably determine the server's fully qualified domain name, using 10.0.2.15. Set the ‘ServerName' directive globally to suppress this message.” Don't worry about this, so far everything is good.
4.5 To test PHP install:
$ sudo nano /var/www/html/info.php
enter the lines below (or just copy/paste):
<?php
phpinfo();
?>
Ctrl+x to save, ‘Y', and ‘ENTER’ to exit.
You can now go to your your ip address and see the resulting “Apache2 Ubuntu Default Page” at http://127.0.0.1 (or 127.0.0.1:8080 if you set this in ‘Vagrantfile') and php info at http://127.0.0.1/info.php (or 127.0.0.1:8080 if you set this in ‘Vagrantfile')
5. Install phpMyAdmin (Optional):
5.1 Install:
$ sudo apt-get install phpmyadmin
IMPORTANT: When the first prompt appears, apache2 is highlighted, but not selected. Hit “SPACE”, “TAB”, and then “ENTER” to select Apache.
5.2 Select ‘YES' on next prompt to configure database for phpMyAdmin with dbconfig-common
5.3 Enter a password for the database's administrative user.
5.4 Then provide a password for phpMyAdmin to register with the database server, and confirm.
5.5 Next, enable php5-mcrypt extention:
$ sudo php5enmod mcrypt
5.6 Restart the server:
$ sudo service apache2 restart
you can now access phpMyAdmin at:
http://127.0.0.1/phpmyadmin or localhost/phpmyadmin
username: root
password: the password you chose in step 5.3
6. Installing an SSH server
6.1 An SSH server should already be installed, but if necessary you can do:
$ sudo apt-get install openssh-server
If it is already installed, you will see a message stating that openssh-server is already the newest version and that nothing was upgraded or installed.
ERROR NOTE: If you can't access the web server and ssh on VirtualBox, you must go into ‘Settings' > ‘Network' > click on ‘Advanced' arrow > click ‘Port Forwarding' . click the green ‘+' icon on the right hand side > then:
make sure to put in Host IP (example: 192.168.1.x) and Host Port (example: 80 or something else…) and Guest IP (example 10.0.2.15 or you can find it using ifconfig at terminal) and Guest Port (example: 80 or something else). For SSH, do the same except Host Port and Guest Port are both 22.
DONE
In the next part of this series, we will walk through Part 3 of our local development environment setup where we install WordPress.
MySQL vs MariaDB
10 reasons to migrate to MariaDB (if still using MySQL)
https://seravo.fi/2015/10-reasons-to-migrate-to-mariadb-if-still-using-mysql
MariaDB versus MySQL – Features
https://mariadb.com/kb/en/mariadb/mariadb-vs-mysql-features/
MariaDB versus MySQL – Compatibility
https://mariadb.com/kb/en/mariadb/mariadb-vs-mysql-compatibility/
MariaDB vs MySQL on Amazon’s AWS RDS
http://cloudacademy.com/blog/mariadb-vs-mysql-aws-rds/
MariaDB 10.1 and MySQL 5.7 performance on commodity hardware
https://mariadb.org/maria-10-1-mysql-5-7-commodity-hardware/
How to uninstall MySQL 5.5 (to upgrade to 5.7)
$ sudo apt-get remove mysql-server
$ sudo apt-get autoremove
REFERENCES
http://dev.mysql.com/downloads/repo/apt/
http://dev.mysql.com/doc/mysql-apt-repo-quick-guide/en/
https://www.digitalocean.com/community/tutorials/how-to-install-linux-apache-mysql-php-lamp-stack-on-ubuntu-14-04
https://www.digitalocean.com/community/tutorials/initial-server-setup-with-ubuntu-14
https://www.linode.com/docs/databases/mysql/securely-administer-mysql-with-an-ssh-tunnel
If you don’t have an account already, sign up to DigitalOcean using this link which will give you a $10 credit (2 months FREE using a $5/mo droplet!) which also helps support this site.